Showing posts with label IslandBatik. Show all posts

Thursday, February 22, 2018

Amish Mini Love - Island Batik Ambassador - Project #2


Island Batik Ambassadors had two assignments our first month (Island Batik provided the fabrics for this mini quilt).  Minis area so much fun - they are fast.   You can hang them or use them on a table as an accent.  Having just downsized to an apartment, I have a little more wall space!  So some of my minis are hanging on a closet door and some hanging on sides of my storage unit.   The requirements were fairly simple.  Less than 24" on a side, use any fabric except our surprise fabric, and any design and post any day.

Today’s mini is an adaptation of an Amish Hex sign.  I grew up in Reading, Pennsylvania where there are many Amish and Mennonite communities.  I loved seeing the hex signs, which are traditionally a sign of welcome and many had hearts on them.  I haven't always loved the colors, so I thought why not do it my own way.  Hearts - mini love - batiks - my home town melded into this little quilt.

I did a little work in EQ8 to see what I could do.  Two problems arose - time and not enough of the background to make larger pieces.  What to do….  AH - make a drunkards path to get the circle - which could use the fabric I choose.  Furthermore, I could solve problem two by  hand-piece while waiting for furniture fabricators to finish up a job.  Brilliant!  

Hand pieceing while waiting
The rest was easy.  I did do machine appliqué as my quilting - again a time saver for this project. 
A mini tutorial:

1.  Make a 4 Drunkard's Path Blocks (size was 6 1/2" unfinished)
2.  Sew blocks together to make a circle or use this method if you have more fabric
3.  Iron fusible web - per instructions - to fabric for points, hearts, and petals
4.  Cut out shapes
5. Iron shapes to background (for a limited time you can download the shapes here)


6.  Sandwich quilt (quilting will be done as you finish the edges)
7.  Use your choice of finishing for raw edge applique


8.  Bind and label
Up next for Island Batik projects:  A new technique for me and a rep sample of our secret fabric. 

Other quilting:
  • Quilt and bind Fancy Forrest by end of February
  • Bind Squiggles during week of March 5
  • Plan March One Monthly Goal project 
  • Design a few more quilts
Linking up with:  Let's Bee Social
                             Sew can She Show Off Saturday
Happy quilting. 


Tuesday, February 13, 2018

Galentine's Day is February 13th!


 Here is my Galentine's Mug Rug.  
For the Island Batik Ambassadors, we were given our first assignment - make a mug rug or postcard for one of your Gal Pals to celebrate Galentine's Day. The fabric for this challenge was provided by Island Batik. A little explanation below and you'll get the gist of what this day is about if you never heard of it (I hadn't before this).

If you’re not familiar with Galentine’s Day, it is a holiday created by the fictional character Leslie Knope from the TV show, “Parks and Recreation”, watch this video. As Leslie explains, Galentine’s Day is a celebration of our best gal pals and lady friends, and it’s the day before Valentine’s Day. Why shouldn’t we celebrate our fellow females who encourage and inspire us???


So what to do.  I decided, for a variety of reasons to do something very simple.  In fact so simple that the I forgot to take pictures as I was going along.  I had many elaborate plans in my head, but as schedules collided I decide that KISS - Keep it simple stupid - would prevail.  Squares and half square triangles and I would be there.  So I worked it up in EQ8 and off I went.


The Galentine's bundle I received from Island Batik is shown and I used each piece. 
Here's the formula for this little quilt if you'd like to make it.


Background Pink Dots 6 - 2 1/2” squares 4 - 3 1/4” squares
Heart center  red fern 2- 2 1/2” squares


Pink/Red swirls 2- 2 1/2” squares

Heart Outside Red sunflower 2- 2 1/2” squares 4 - 3 1/4” squares
Backing Beige butterfly 1 - 9x13” rectangle

Binding Pink/Red swirls 2 1/2” strip 50” long 50” long


Brief instructions:

  1. Place the light pint and dark red squares together.
  2. Mark the 3 1/4" light pink squares with a center line, and 1/4" on each side of that line. 
  3. Sew, and cut apart.  Press to dark side. TRIM to 2 1/2".
  4. Lay out all the squares and the half square triangles according to the picture above.
  5. Sew together (I usually pin to be sure I don't sew on the wrong side of the pieces).
  6. Sandwich.
  7. Quilt as desired.


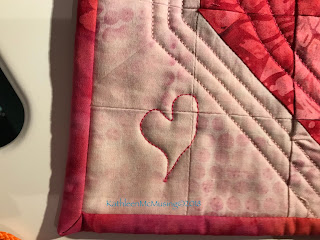
I simply quilted the outline of the heart in a matching pink thread (Mettler 50wt. #803) and the interior of the heart with some free motion hearts (Mettler 50 wt, #960).  I thought it could use a little more so I just drew the little hearts in the bottom corners.  Yes, it was a close call with the one thread (but I did have another spool in case).


My label was attached, then the binding.  The label is from Tagtopia - and is a great way to get that done nice and quickly.  I sometimes do more extensive labels - you can see it in my tutorial.    I did use Aurifil #2600 for piecing and for the bobbin thread while quilting.  The threads played nicely and didn't need any tension adjustment on my Janome 3160 QDC (the machine in Maine).

Imagined, sewed, quilted, labelled, bound and off it goes!  I kept it simple and did my first project as an Island Batik Ambassador.  I hope my friend loves and enjoys it as much as I did!


Linking to:  Linky Tuesday    
                  Main Crush Monday 
                  Let's Bee Social
                 Wednesday Wait Loss


Sunday, February 4, 2018

#365DaysOfArtPBQChallenge, Week 5, #29-35


 Day 29:  Explore colors that look good together
Well this was right up my alley.  Love this exercise and could do pages and pages of it.  

Day 30:  Add details to the flowers, use cut out pieces if you like or other material.  
Didn't love this one, and didn't feel like getting other types of material. I think I felt limited by the already drawn flowers.

 Day 31:  Draw your desk or table, any materials.....the table, whats on top, etc.
I kind of enjoyed this one.  My ironing board with a quilt that was on it and its new ironing cover.  Not actually orange and green but I didn't have a good way to depict the white and beige cover.

 Day 21:  Add foliage to the rest of the trees
 (leaves, abstract shapes to suggest form of tree)
Some of my trees were more successful than others, some were more fun to draw than others.
Not patient enough to draw a lot of leaves that night.

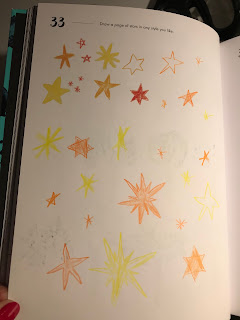
 Day 33:  Draw a page of stars in any style you like
Liked doing the stars.  Loved the funky orange one in the center of the page.

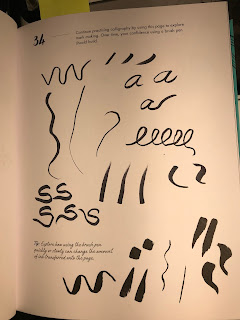
 Day 34:  Continue practicing calligraphy by using the page to explore mark making.
I am using a paint brush marker for these, not the best.  I do know how to do calligraphy, so I should get a few markers to do a little.

Day 35:  Complete the pattern
This was fun, although free hand circles are not my thing but I loved this one.  

You can expect a few other blogs from me this week: One Monthly Goal, Opening of the My First Island Batik box, and a Squiggle update!  

Linking up with #365DaysOfArtPBQChallenge

Wednesday, January 3, 2018

An exciting annoucement!


Can you believe it???  I can't.

I saw the announcement come across my blog feed that applications were being accepted.  I thought, what the heck, I may as well apply!  I was so inspired by the work of a few quilters that I follow:

Laura Piland at Slice of Pi Quilts

and

Jennifer Fulton at The Inquiring Quilter.

I met these wonderful quilters during the 2017 New Quilt Bloggers event and started following.  I have quilted a long time, but my primary joy in quilting is trying new things, stretching my skills and sharing them with others. I hope that is what this opportunity holds for me.

Watch for announcements for the 2018 New Quilt Bloggers group if you are interested in expanding your horizons.  February 1 is when the new applications begin being accepted.  I have broaden my blog presence and met many new friends in the journey.

Island Batik fabrics are wonderful and I can't believe I'll be receiving a shipment soon with a mission to accomplish. For now, feel free to browse their site for fabrics coming in 2018!  Each month we are given an assignment and off we go - creating and blogging about our successes and sometimes our failures.

Wish me luck, its going to be an interesting year!