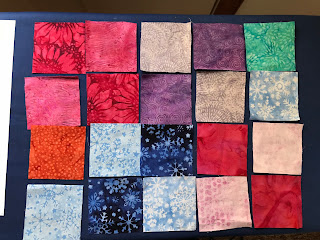
This fun project is a combination of work for 2 groups. Island Batik provided the fabric and the International Association of Quilters gave me the pattern to work up as a project lead for this freebie for members.
The challenge for Island Batik this month was to make a pillow. I thought the project from IAQ was just perfect. First up - picking fabric.
First, I laid them out in what I thought was a pleasing order.
Per the instructions, I sewed background and "peekaboo" fabric together.
Here is what the back looked like. Then I decided to add another row, in order to make a square pillow.
I auditioned a few of my scraps, and then added the rows like I did before. My fabric choices were dictated by which Island Batik fabrics I already used and had some scraps. This is my first year as an ambassador, so I am being a bit conservative with my larger pieces until I have a sense of what I will need through July.
Mark the orange peel, lightly, on the fabric. I am partial to Sewline pencils, but whatever you do, use a light touch. You can see the marked orange peels on the assembled quilt. I cut on the line - so no remnants are left behind. Remember: what you see is what you get!WHEN MARKING THE ORANGE PEELS:
Think about seams and quilting through them later - give yourself 1/4" near the seams to save you some difficulty in quilting later.
 |
| The orange peels |
 |
| With the centers removed |
The next step is to layer with batting and a backing, I used safety pins to hold it together because I was hand quilting. Since mine was going to be a pillow I didn't worry too much about the fabric I used in the back. I quilted with a variegated 12w thread from Valdani. I tried to get my stitches more even on the front than on the back, again knowing this was going to be a pillow.
HINT: use a needle that can be threaded with the weight thread you will use AND can easily go through your layers. I had to try a few until I found one I liked (remember batiks are a little harder to quilt but the right needle helps).
I then picked a binding. I needed 48 inches so I needed more than one strip - so I used the reverse of a Christmas batik in red, as I liked it the best. Sometimes there are two sides to a batik, and sometimes you need to use the back side
I decided to use the envelope method, so I first cut two pieces that were about 12.5" x 15". I turned one edge on each down, pieces now measuring about 10". I then top stitch along each edge. Sandwich on and sew on the binding to the front. Hand sew to the back.
HINT #1: I like bigger pieces so "the belly" of the pillow doesn't peek out!
HINT #2: Backing and Binding are sewn together. WRONG sides together for front and back. The binding is attached to front and turned to back (like most quilts).
A simple pillow insert was made with poly fiberfill. I measured the pillow from the back and made the insert that size (2 pieces cut 12" square). Sew up on three sides. Stuff and test the insert in your pillow, add more fill or not, close up the insert! Stuff it into the pillow and you are done!
Voila - your pillow is done!


