Wednesday, May 17, 2017

A finished top #FreeFallQAL


My Free Fall Quilt Along project is done, well the top is done.  "Done" is a funny term for quilts, as there are often many stages of done in getting to the the finished quilt.  Here are a few things quilters consider a quilt done:  
  1. finishing the blocks, 
  2. piecing the blocks together, 
  3. sometimes adding borders, 
  4. quilting the quilt, 
  5. adding the binding,
  6. putting the label on - NOW IT IS REALLY DONE! 


I really love the way it turned out.  I hope to get it basted so I can quilt soon, but am traveling this weekend, so it won't happen until next week at the earliest.   I have a few ideas about quilting it, but haven't really settled on the plan just yet.

Thank you, Sandra @ mm quilts for a great QAL.  It was fun to see what others choose and an unexpected project that I really enjoyed - using up my stash/scraps is one of my goals this year - and I love this little quilt.

Linking up to Let's Bee Social

Things I am working on:

April and May UFOs (a little late on April)
-Prepping M3 (Meadow Mist Mystery) Quilt for quilting on 5/23
-finish shashiko block and make pillow cover

Ongoing
-pick some colors for La Passacagalia
-begin animal alphabet quilt
-label a few quilts (I think there are about 4 needing labels)

Friday, May 12, 2017

Finish It Up Friday & FreeFallQAL #4

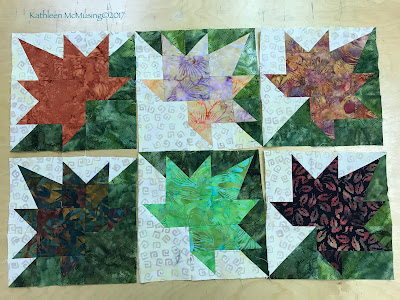
I finished the 6 blocks for my #freefallqal.  I love they way they come together and most likely it will remain a smallish quilt.  I don't have enough background to float the quilt as I would like (only the equivalent of 3/4" so I don't think it is worth it, but I may try....  That decision will be for next week.

The last three blocks for the #FreeFallQAL


For this week's blocks there were actually 3 different layouts for the blocks.  Two blocks were hard (not paying attention), the next two easy, and the third set I cursed myself by saying to a co-worker, I am nearly done!  Only two seams had to be ripped out but interesting how easy it was for me to mis-sew or misplace a piece.

And here they are on the table ready to be sewn together!

The proposed layout for the blocks


Linking up to Sandra at mmm! quilts and Crazy Mom Quilts.

Wednesday, May 10, 2017

A class and a plan....

This was a really busy week for me with 5 appointments, work and a class on the weekend.  I didn't get a whole lot of quilting done, but here is what I did when I had time (or the class).
The layout of the rest of the leaves on #freefallqal

I continued my work on #freefallqal sponsored by Sandra at mmm! quilts.  Earlier in the week, I followed Yvonne's suggestion and tried to figure out the location of blocks before I piece the last 6 blocks for the quilt.   I think this will work and  I began piecing the first two.  I got lost somewhere, and put it down until later today, when I should have more time and a clearer mind to see where I went wrong.  I didn't piece it so it was the parts of the unit that were driving me nuts.  I do believe in stopping when it isn't working out.

On Saturday, I took a class with Nancy Halpern.  She is a local quilter who has been quilting for over 20 years.  She has taught nationally and internationally and I was intrigued by her quilts.  You can see a little more about her here.  Below is a picture of a traditional Japanese Puzzle quilt.

A traditional Japanese Puzzle by Mabry Benson


Our task was to take an impressionist picture or a picture of our choosing and turn it into a Japanese puzzle quilt.  You can see a bit of  the picture on the bottom right of the picture below.  


It is a complex process of cutting out the four pieces from one fabric and rejoining them with adjacent blocks. 

Here is a piece of the Japanese Puzzle on Nancy's quilt

The actual patch that is sewn is outlined in the red lines.


I have no idea when I'll get back to this, but here is where I left it my quilt at the end of the day.  I attempted to have the water going around the blocks.  It is fun seeing how this might work!  I have to admit halfway through the process I was unsure.  I do hope that I can get back to it before long.

End of the day


Meanwhile, I will link to Sew Fresh Quilts for Let's Be Social Wednesday!


Monday, May 1, 2017

2017 New Quilt Bloggers Introduction Post

Being a part of the 2017 New Quilt Bloggers has been a gift and today is the day I am one of the featured bloggers in the Blooming Quilters Hive.  There are plenty of new quilt bloggers debuting today and you can check in at the Queen Bee's pages where you can meet other new bloggers and register for prizes:


A little bit about me:
My sewing career began early in life; my grandmother, Petronella, taught me how to sew so I could make doll clothes.  The thimble in the picture below resembles her thimble, which I still have.


Soon, I wanted to know more and a neighbor taught me how to make dresses and, for many years, I made my own clothing.  Eventually, I worked in a fabric store that sold clothing and designer fabric. The store was frequented by Amish women who lived in the area.  Once in awhile, I would see their wonderful quilts.  I am sure that this began my love affair with quilting.

Fast forward a few years...and I am in graduate school in Boston.  There was a quilt store in Harvard Square and when I was out of grad school a few years later, I took a quilting class.  I was hooked! Like many, I began learning by hand.  Soon, I began making quilts by machine.  I joined a guild and later worked at my local quilt store, Cambridge Quilts (almost 18 years!!).

I am fortunate that my quilting has spanned many years.  My other crafts come and go but this has remained a constant.  I have become an avid quilter and teacher.  I enjoy learning new techniques and am always eager to find new projects that either challenge my design sense, encourage a new skill and then hopefully I can share the skill with someone else!

MY QUILTS:
First:  My first quilt was all done by hand.  It took 15 years.  Someone convinced me to make those little starts in the lattice!  I love this quilt and still use it on my bed.  You can see that LESSON LEARNED:  Fabrics see that the muslin has a bluish tint - the fabric bled!!!  I was all my fabric and if I am not sure, I wash it again.


A Middle Quilt:  This is a quilt I am really proud of - also mostly done by hand.  The pattern was Les Fleur de Jardin by Lisa DeBee Schiller.  I don't know if I will ever do another appliqué quilt this large, but I did love doing it. I met some good friends in the class that started this project.  I joined my guild, Rising Star Quilters, as a result of this class!  This may be as close to making a Baltimore Album as I ever get.  


New Skills: I learned to feel confident about machine quilting on my new Bernina 440 QE by making this quilt.  It was a mix of using a walking foot and free motion quilting and the pattern was called Quilt-As-You-Go Machine Trapunto by Keryn Emmerson.  I am not expert at machine quilting but can do most of what I need on a domestic machine up to a twin size quilt.  


Recent Finish:  This quilt just plain makes me happy.  I love the way it came together and that a wonderful baby received this quilt.  I purchased the pattern, Fancy Forest by Elizabeth Hartman with no plan to make the baby quilt.  I could not get the quilt out of my mind and then I thought about a baby that will love this quilt.  Her parents both worked on my house in Maine (he the carpenter and she the landscaper).  I was on a mission and it was done before she arrived.   I have already made a second one with some changes and should be quilting it in the early summer (future post).


MY TIPS FOR QUILTING:
Here are a few tips I always try to impart to my students:
  1.  Quilt what you love and love what you quilt.   
  2. Keep moving ahead. If there is a mistake that will not stop your progress, let it go and return to it when further along. Fix it then. if you still need to, rather than getting hung up or putting the quilt away for a future date. 
  3. Challenge yourself to learn something new with each project.  
SOME OF MY QUILTING GOALS FOR 2017:
This year I have set a few goals for my quilting.  Blogging helps to challenge me to pay attention to these goals.
  1. 2017 APQ UFO resolution which challenges you to complete one project a month.  You can see my list here for this year and a slideshow and list of what I finished last year here.
  2. To use EQ7 to design a few quilts which will use fabrics that were collected for a quilt, but I don't  have a particular pattern in mind.
  3. Make a Modern quilt, entirely my own design.  
  4. Continue to reduce my stash.

So tell me, what is are your quilting goals this year?

Thanks for stopping by, 

Monday, April 24, 2017

#FreeFallQAL Part 3

I finished this piece a bit ahead of schedule!!!!


It is fun to see this come together.  I chain stitched a whole bunch of the segments together, which helped the assembly go much quicker.  Here is one part of the chain!  The first picture is of the pile on my desk, waiting to be sewn.  The second is the chain of that pile hanging on the door in my study!

I thought that was pretty entertaining.  On the whole, I  have figured out that having a system of organization for this is making me much happier.  Many patterns have pictures of the units, and while I don't really need them, I had to come to some easier way of putting this block together.

1.  Mark and make the half square units.
2.  Pin all the pieces that can be sewn next (one flying geese unit, 3 half square-rectangle units, one half square /square unit), so that the pin is on the side to be sewn (saves pieces getting turned and piecing on the wrong side).
3.  Sew and Press
4.  Pin next set of sections, sew and press.
5.  Continue until the top and bottom half of the block is together
6.  Sew the block together

So much happier putting this group together!!

Sunday, April 23, 2017

A finished table runner from scraps!

I finished this table runner (at least I think so) and I am so happy. It was from some leftover flying geese which I  made for another quilt.

Like most of the time, I quilted this on my Bernina 440QE.  I mostly used my walking foot but also my ruler foot for a very small piece.   As I worked, I found it was easier to do each side of a "goose" rather than twist around each one.  Here's a picture of the back.  


I am finding more and more I love my "in the ditch"  quilting foot.  Its a new plate for my Bernina 440Q walking foot.   Also, it made it easy to go around the edge of the quilt with stitches by moving the needle a few "dots" either left or right of center. 

But I still wanted to do some  ruler work on  the inside of the stars.  It was so much easier than marking it!  I'm glad I did it.  Speaking of marking, I wasn't sure about doing the shadow geese in the solid fabric, but I finally did it and am glad that I did.    I think it help completes the table runner.

This pattern was adapted from "Elegant Runner" by Terry Albers in Fons & Porter's Easy Quilts, Fall 2012.   I saved it knowing I had these flying geese to use up.

Another UFO finished for 2017!


Friday, April 14, 2017

#FreeFallQAL Link Up #2

I finished the first 8 blocks for my FreeFall QAL!


I love the way they are turning out.  These are leftover scraps form at least one bed quilt and a few fat quarters that were stashed some time ago.

However, I was not paying attention...and here are a list of the errors of my ways:
  1. made 2 sets of flying geese (only needed one),
  2. didn't trim my half square triangles,
  3. didn't trim the flying geese, and
  4. don't try to put an off center block together with the two sets of flying geese (I did it, but much faster to take them apart.
Here is a picture of some of the trimming along the way.

Helpful hint#1:  
 When paper piecing, you can glue the first piece to the paper to keep it in place, easier than dealing with pins.  For this project, I "chain-glued" - glued all the 8 points at one time.


Helpful hint #2:
When trimming squares you can trim on two sides at once, and if you have a turntable mat, this is a good time to use it!